
 Lesson #6  Please watch this week how your students’ mastery of Melodic Patterns and Chord Fingerings are going. I am seeing some fingering confusion and habits that will be hard to break the longer they practice them incorrectly. Focus and encourage lots of Red, Blue, and Yellow chord transitions this week, with both right and left hands separately. Celebrate Connection A few ideas to bring playfulness to practice time!
Registration for next semester is right around the corner! I’ll be holding free preview classes in just a couple weeks for new families to see what Let’s Play Music is all about. Please help me spread the word… I do give referral bonuses! Please feel free to sign up for a free preview class if you ever had to miss a class. (It’s the closest thing to having a make-up class that I’m allowed to do!) Classes are always more fun with experienced families, even if the kids are a little older! Do you have another child that is going to be 4 years old by September 1st? Sign up for a Let’s Play Music free preview class for them! Do you have another child that is 0-4 years old that would benefit from Sound Beginnings? You’re welcome to sign up for a free preview class for that as well! 
Melodic Patterns
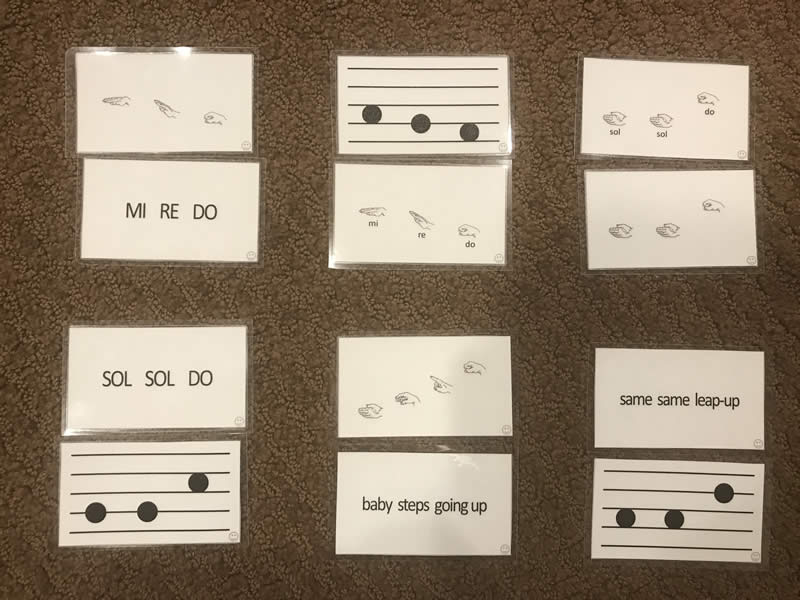
In case you missed it, I have created this printable Melodic Patterns Matching Game. This has all 5 melodic patterns in it. You may use whichever cards you wish (as long as there is a match). Any card that has the same pattern is a match (see picture example). The simplest way to make this game is to print on thick paper (or even regular paper) and cut them out. You can laminate them if you wish. Better yet, they fit perfectly on business card paper so you can just print, fold, and tear apart! Be sure you and your child sing ♫ each pattern as you turn the cards over! Hickory Dickory Dock 
Why the importance of chords in piano playing? Kristi Ison, a Let’s Play Music teacher in Mesa, Arizona, shares the Top 10 Reasons for Learning Primary Chords! Have a musical day! -Ms. Bethany 🙂  |
-
Orange Roots #5
<!-- InstanceBeginEditable name="doctitle" -->Orange Roots Newsletter<!-- InstanceEndEditable -->  Lesson #5
Thank you parents for coming this week! Your participation plays such a big role in your child’s success! Don’t forget tuition is due for those of you that didn’t pay for the semester up front. You can pay through Zelle (using my phone number) or Venmo me (@musikandme).
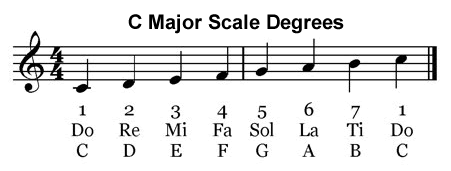
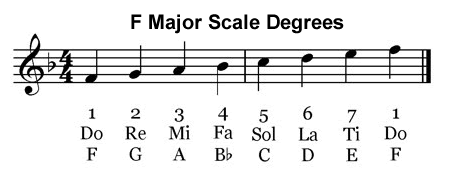
Here’s a little help with this week’s theory assignment. In a major scale, we start numbering each note at 1 and because it begins to repeat after number 7, we go back to 1. This is the same way we go back to DO or C.
 Even though the students cannot play all three parts of New World at the same time, you (the parent) should be able to play a part or two with them at home. Have fun playing as a family ensemble!
This next week I will be meeting with your child in their 1st private lesson to begin creating their composition. We have been working during class to brainstorm ideas we might like to use, and have been encouraging ‘tinkering’ at the keyboard at home. Please encourage your child to be thinking about a musical question (and maybe an answer) that we could work on together next week. This could be a simple melody or some chords that they have written down, can play, or even just hum. Or if they have specific characters they want in their song, they can write a short melody for each character. This is only the beginning of this process, so I’m not looking for you to send a ‘finished’ product. Feel free to watch the supplemental videos with your child (links down below). Please send your child with their Orange Roots Songbook so we can look over their Composer’s Corner activities together. Thanks!
I’ll text the schedule for next week’s 20 minute private lesson. Please have your child watch the “Composition Help” video right away to spark ideas for how to write their composition. They don’t need to write anything beforehand if they don’t want to, but watching the video will help them feel more confident when they come to the private lesson. If you watch it with your child, you will see just how simple it can be to compose a song!
PLEASE be on time for drop off and pick up! This private lesson is only for the students, but if you need to come stay warm inside, you are welcome to!

Online Fun:
Use the timer option to substitute for doing purple flashcards! (just write your time!)
Flashcards – Staff to Letter
Say It & Play It – Staff to Letter to KeyboardComposition
The composition is the culminating event for your Let’s Play Music student! We have been experiencing, internalizing, and now labeling many things over our three year development as a young musician. We will rely on our knowledge of: major and minor, time signatures, chord uses and sounds, ABA song form, staccato and legato, theme and variations, block, broken, and marching chords, and MANY other skills that will help your child as they compose and create their own original composition.Magic Keys
This is our 2nd song to graduate up with us from our purple semester. As we continue to sing (and play this song) we will further expand our understanding of key signatures and note relationships–This is the KEY in transposing music. Our new verse allows us to understand and play in the key of G Major, with our new magic key, F#.
G Major Cadence 
Composition Help Here are 3 helpful videos that break down 3 different ways to start a song. Your child might like to try one of these ways: Start with Melody, Start with Rhythm, Start with Chords.
 Homework theory answer key, all skills videos, and make-up videos for missed classes:
 (tap, click or scan)
 Inspiration for composition can come in many ways. A man saw birds sitting on telephone wires and it inspired him to create his own composition. Can’t wait to see where all of our students get their inspiration from! Excited to meet them all individually next week.
Have a musical day!
-Ms. Bethany 🙂
-
Blue Bugs #5
<!-- InstanceBeginEditable name="doctitle" -->Blue Bugs Newsletter<!-- InstanceEndEditable --> 
 Homework theory answer key, all skills videos, and make-up videos for missed classes: (tap, click or scan)
 We have a great article on subdividing. Check it out here!
Let’s take a walk in the jungle! “Walking In The Jungle” uses full body involvement (walking, stomping, jumping, skipping) with some creative play to teach steady beat. Gather your children and teach this song to the whole family.
Listening to music can spontaneously include doing some of the actions too! For instance, if you hear the song Umburra, sit down and pick an object to pass around on the beat. If you are practicing Bill Grogan’s Goat, have your student clap 4 times or nod their heads 4 times, between each line, etc. The more senses you use while “playing” the more your student will internalize. Let your student pretend “teach” a Let’s Play Music class to you, their siblings, or stuffed animals. This is great music practice and it’s FUN for them!
Have a musical day!
-Ms. Bethany 🙂
-
Yellow Arrows #5
<!-- InstanceBeginEditable name="doctitle" -->Yellow Arrows Newsletter<!-- InstanceEndEditable --> Lesson #5 Thank you parents for coming this week! We can’t have parent days without you!
Looking ahead to next year, as of right now, I’m planning to teach 3rd Year at almost the same times I’m currently teaching this class. So in August when we start Purple Magic, it will be Tuesdays at 4:00 or 5:30. (I need the extra time between classes because class is 55-60 minutes long.) Please let me know if that will or will not work for you.
Please cut out the letters as they are needed and play the alphabet keyboard game with your child. (If they’re already cut apart, just pull out all of one letter at a time.) Play this game on the largest keyboard you have. (If you have a piano with 88 keys, this is preferable to playing it on a 66-key keyboard.) You can do this separately from regular practicing. Just keep each letter session very short to begin with. You can even have several sessions in a day. We want the kids to enjoy playing this game. Maybe time them and have them beat their best time! The instructions I wrote in the Ziploc bag are different than those in the book. I have learned from experience that learning one new letter at a time makes it easier for the kids to remember. You should be able to play the game as described in the book very soon, but isolating the letters to begin with helps alleviate confusion. The repetition will help them remember faster. They will visualize the white keys for what they are, rather than what they are in relation to each other. If you have any questions or concerns about any of this, please let me know. I have many suggestions, but don’t want to overwhelm you with all of them at once!
Celebrate Connection
A few ideas to bring playfulness to practice time!- Blink with each note/chord you play in the bass clef (LH).
- Close your eyes, and run your finger over your music then stop and open your eyes. Start from wherever your finger landed and play through to the end.
- Knock on the wood/plastic of your keyboard when you come to Mr. Rests.
Online Fun:
Here’s a simple keyboard note naming game I built on my website – Name the NoteBass C and Treble C
The 3 C’s are in a family; they have different first names and the same last name! We’ve known Middle C since last semester. This week we introduced Bass C: 2nd Space in Bass Clef is Bass C! (♫ “Second space is C in the bass”) AND Treble C: 3rd Space in Treble Clef is Treble C (♫ “Space 1-2-3 is treble C”). These anchor notes on the staff will help orient us as we expand our keyboard skills. Treble C is just one octave up from Middle C and Bass C is just one octave below Middle C. You can look at pg. 56 in the homework book for reference, if needed.C Major Scale
Now that we know where Treble C is on the keyboard we can play the C Major Scale going DOWN. The technique is exactly like the Left Hand, though playing it with the Right! Practice this SLOWLY to ensure correct fingerings and bubble hand position. 1) Begin with RH finger number 5 on Treble C. (This is the C right above middle C.) 2) Play Do, Ti, La, Sol, Fa using fingers 5-4-3-2-1 with a rounded bubble hand. 3) To play Mi, POP finger number 3 over thumb. 4) Reset the BUBBLE and proceed to play Mi-Re-Do with finger numbers 3-2-1.I am Robin Hood
Shoo-oot the Ar-row, Waa-atch it fly—, teaches us how to feel and play the dotted quarter eighth note pattern (our bulls-eye and arrow feather) right on target. To feel this rhythm more accurately dance with the CD, stomp out the rhythm with hands and feet, or even sit them on your lap and bounce your knees up and down to the rhythm while chanting the song together. Mix up practice with this song by playing the bass clef 5th an octave lower to really sound like a deep drum!Mr. Rest
Could you believe all the musical symbols Old MacDonald had on his musical farm? A rest, though played with silence, is a very important aspect of music. Mozart said "The music is not in the notes but in the silence between." Rests are powerful!C Major Scale Right Hand Descending
Homework theory answer key, all skills videos, and make-up videos for missed classes: (tap, click or scan) Playing the Alphabet Pieces game every day will help us solidify keyboard geography by learning the names of ALL of the white keys. Once your child knows all the letters individually, you can enjoy playing this game with its theme and variations!
Have a musical day!
-Ms. Bethany 🙂
-
Orange Roots #4
<!-- InstanceBeginEditable name="doctitle" -->Orange Roots Newsletter<!-- InstanceEndEditable --> Lesson #4 Parents come next week and tuition is due for those of you that didn’t pay for the semester up front. You can pay through Zelle (using my phone number) or Venmo me (@musikandme).
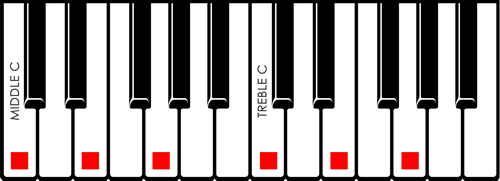
We started working on chord inversions this week. Use the red stickers on the cover of your child’s homework booklet to help them easily jump from inversion to inversion. Starting on Middle C, put 6 red stickers on your keyboard at home as shown on Lesson 4. of your student manual. The stickers should be placed on middle C, middle E, middle G and treble C (the C above middle C), treble E and treble G. The 3 heart erasers are meant to be placed on the first 3 keys with red stickers, then moved up one at a time to the next matching note as they change hand shape to match the notes being played. Once they understand the concept, they can just look at the stickers to see where their fingers should go. (Remember, these are ALL red chords, and we’re just playing the same pieces in a different order.)
Please, please make sure your child is using the correct fingers listed in the book. I made a chart for quick reference:
Chords
Correct Fingering Shape Left Hand Right Hand Snowman 5-3-1 1-3-5
Top Heavy 5-2-1
1-3-5 Bottom Heavy 5-3-1
1-2-5
We learned how to play the F Major scale! We play the left hand the same as in a C Major scale (don’t forget the B-flat)! The right hand is DIFFERENT! We learned a fun chant to help us remember what fingers to use:
For going up: 1-2-3-4, 1-2-3-4. Different than I played before!
And for going down: 4-3-2-1, 4-3-2-1. Wow, my F scale’s lots of fun!Do NOT have your child play hands together until they can do both LH and RH independently! We want them to feel successful, not frustrated!
 We reviewed that eighth notes have one beam (the horizontal line) holding them together. They get half a count when bugs (quarter notes) get one. They are counted out loud: "one and two and three and four and".
 Sixteenth notes have two beams and they get 1/4 of a count. They are counted out loud: "one ee and a two ee and a three ee and a four ee and a". We write this a little more simply (as shown in the homework).
Be sure to look at reference pages 50 and 51 in your homework book if you need a little clarification. If you still can’t make heads or tails of it, please ask me! I know this is just as new to some of the parents as it is to the students.
Online Fun:
Beat Value Matching Memory GameCockles and Mussels
Here’s a video of how the LH chords step up and stay in root position. It also shows how to play broken chords if your student would like something additional to work on!Inversions / Mixed Paint
New World Symphony
We actually HAVE played our yellow and blue chords in inversions–we just didn’t realize it. We are now ready to take a root position chord and ‘invert’ it. This just means re-arranging the pieces. The chord is still CEG, but C moves to the top, then the E moves to the top, then the G and you are in root position again. We will play Old Paint in a new ‘Mixed’ up way to help us hear that it’s still a red chord no matter matter if it is in root position, 1st inversion or 2nd inversion. No matter what the shape or order is, it just has to retain the same ‘pieces’ (in this case C-E-G) for it to be a red (C) chord. Be sure to add your stickers to your keyboard! (See diagram above!)
Our Let’s Play Music students have created harmony in many different ways in 1st and 2nd year. Now in 3rd year we have the unique opportunity to play as an ensemble in class to produce harmony and a much fuller sound than they can accomplish playing by themselves. By listening to the CD, the children are provided the opportunity to model and to audiate the music in their heads as they practice.
Our Bugs are So Fun! (new verse)
A few of our songs from our purple CD have upgraded to our orange CD–with some new lyrics! The new verse in ‘Our Bugs are So Fun!’ will help us to learn to count those tricky ‘beamed’ rhythms that include eighth notes and sixteenth notes! If counting in this new way seems tricky, here is a parent help page that dissects the lyrics to Our Bugs are So Fun! with visual examples and simple explanations to help.How to Play C Chord Inversions How to Play F Major Scale Cockles & Mussels Broken Chords
Homework theory answer key, all skills videos, and make-up videos for missed classes: (tap, click or scan) Check out this young group of musicians experiencing the value of playing as an ensemble. Your student will recognize this piece as our very own Largo from New World Symphony by Antonin Dvorak.
Have a musical day!
-Ms. Bethany 🙂
-
Blue Bugs #4
<!-- InstanceBeginEditable name="doctitle" -->Blue Bugs Newsletter<!-- InstanceEndEditable --> Homework theory answer key, all skills videos, and make-up videos for missed classes: (tap, click or scan) Identifying minor songs is a majorly important skill! Read why here…
Also, watch this video of I’ve Been to Harlem with your student about major and minor!
For even more fun, check out this video too!
Have a musical day!
-Ms. Bethany 🙂
-
Yellow Arrows #4
<!-- InstanceBeginEditable name="doctitle" -->Yellow Arrows Newsletter<!-- InstanceEndEditable --> Lesson #4 Parents attend next week and tuition is due for those of you who did not pay the semester up front. You can use Zelle (using my phone number) or Venmo (@musikandme).
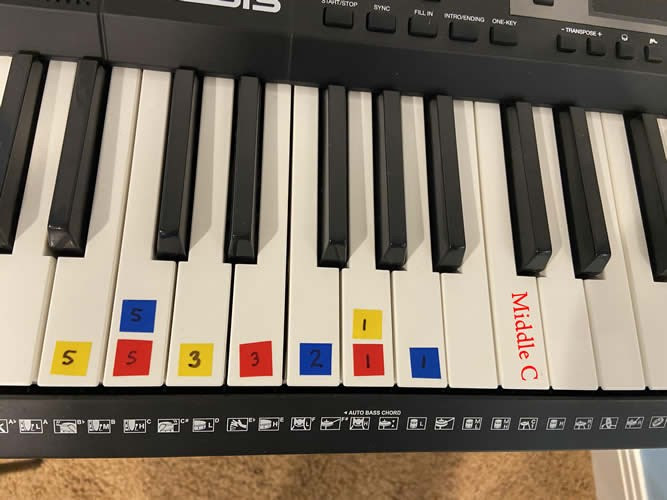
Please add your yellow stickers to your keyboard so they look like this. We have now learned the yellow chord, which is played with fingers 5, 3, and 1 on the left hand. We “glue” our thumb down and slide fingers 3 and 5 down by one baby step. Please be sure your child practices using the correct fingers! (In left hand we use the same fingers as the red chord!) Your child needs to beconfident with left hand chords alone before attempting to play both hands together. We would like success, rather than frustration!
Within the next month we will start enrolling for next year. If you have friends or family that you want on my waiting list to start 1st Year, please share the link ASAP so I can get their information before I begin open enrollment up to the general public.
Please respond to my survey so I know what days/times work for you for next fall! I want to be sure you have a class! Here’s the link:
https://forms.gle/hhaxJFGVgMG4BBog6
Celebrate Connection
A few ideas to bring playfulness to practice time!
- Have a contest between yourself and your child to see who can play the most transitions between the red and yellow chord with the left hand in 30 seconds! Have your child try to beat his/her own record!
- Practice chord transitions from red to yellow with your eyes shut! Use your ears to tell you if you are playing the right notes. Make sure you always use the correct fingers for each chord! (5, 3, and 1 for both chords.)
- Guess the chord. Have your child play a chord and you guess which color chord it is. Then switch roles and have your child guess what you are playing!
Online Fun:
Review finger numbers with these fun games I made! Choose between matching and memory.
Finger Number PracticeC Position & Middle C Position
We learned where the RH and LH rest on the keyboard for both of these positions. With C Position the RH Thumb (Finger 1) is on Middle C and LH Pinky (Finger 5) is on Bass C. With Middle C Position both Thumbs (Fingers 1) share Middle C. We liken this position to a butterfly. The two thumbs resting on middle c together are the butterfly body and their hands are the wings. Are their soft wings (fingers) resting gently on the keys? Don’t forget your “BUBBLEFLIES!” (That’s bubble hand butterflies…I made that up myself!)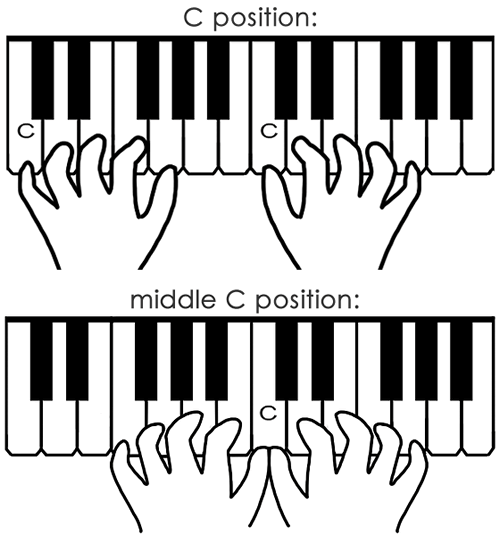
A fun review is to chant each position, simply moving the LEFT HAND back and forth. Practice in the air, at the kitchen table, in the car running errands, and of course on the piano!
Caterpillar Song
This week when we played Caterpillar Song in class, I was SO impressed with how well the kids “glued” their fingers to the keys! This song is only meant to be fast if fingers aren’t flying off the keyboard. Remember, CATERPILLARS DON’T FLY! Please be sure the kids practice this way EVERY TIME they play this song. Having good “BUBBLEFLIES” (for this song especially) will help them develop the correct habits that will manifest themselves in all our other songs!
C Major Scale
We learned how to play UP the C Major Scale (Do, Re, Mi, Fa, Sol, La, Ti, Do) with our LEFT HAND. We don’t have enough fingers to play this scale, so we learned how to POP our bubble hands and then reset them to complete the scale. Practice this SLOWLY to ensure that your child plays this correctly. 1) Play Do, Re, Mi, Fa, Sol with 5-4-3-2-1 fingers with a rounded bubble hand. 2) To play La, POP finger number 3 over the thumb. 3) Reset the BUBBLE and proceed to play La, Ti, Do with finger numbers 3-2-1. Sing the scale with finger numbers: 5-4-3-2-1-3-2-1. Don’t have them try to play down yet, just UP.
I am Robin Hood
Enjoy ‘drumming’ the slow slugs on the piano with the interval of a 5th using Left Hand Bass Clef fingers 5 and 1 when practicing this song. Sing the melody together while parents drum along on laps, the edge of the piano, clap along to keep a steady slug beat or drum with any can, canister, or container from around the home. Switch places so parents can play and kiddos can drum!
Do You Want to Build a YELLOW Snowman?
This bottom heavy snowman built with a 3rd on the bottom and a 4th on the top is melting from the YELLOW sun! We play this chord with fingers 5-3-1. Place Left Hand in C Position. SLIDE Finger 5 (pinky) and Finger 3 (middle finger) down one baby step while Finger 1 (thumb) stays put. Now time your musician for 30 seconds and count how many bass clef Yellow Chords they can play!C Major Scale Left Hand Middle C vs. C Position & Review Caterpillar Song
Homework theory answer key, all skills videos, and make-up videos for missed classes: (tap, click or scan) We call our new puppet show “The Pirate Ship” but the real title is Hungarian Dance No. 5 by Johannes Brahms. The Hungarian Dances are a set of 21 lively dance tunes based mostly on Hungarian themes. They are among Brahms’ most popular works, and were certainly the most profitable for him. Each dance has been arranged for a wide variety of instruments and ensembles. Brahms originally wrote the version for piano four-hands and later arranged the first 10 dances for solo piano. The most famous is Hungarian Dance No. 5.
Have a musical day!
-Ms. Bethany 🙂
-
Orange Roots #3
<!-- InstanceBeginEditable name="doctitle" -->Orange Roots Newsletter<!-- InstanceEndEditable --> Lesson #3 I can build a triad! From any note on the staff, I just add a 3rd and a 5th. Then guess what! I can move the notes around (as long as they stay on the same letter) and the root is still the same. If the chord isn’t in root position, then “the note above the gap’s the root” (just listen to the song… it explains it all!). We will continue to explore this concept in the coming weeks.
 In “John Jacob Jingleheimer Smith” we found that it was missing a note in the first measure in the bass clef. We decided what note we should put there by finding out what the root of the chord was in the treble clef. We wrote some of the letter names in the space between the treble and bass clefs during class, but the kids were told to finish writing them at home.
While we are only practicing the first two lines of part I in “From the New World,” it would be easy to just simply ‘play’ it, but remember to not only sing the note names, (“e-g-g-e-d-c” etc.) but try singing the rhythm as well (“shoot-the half note” etc.) while playing it this week. Or you could even sing the counts! (1+ 2+ 3+ 4+…) This is a wonderful song to practice counting with.
For additional counting practice you can download the counting cards that were included in last week’s email. Make counting fun by using something unusual to keep a steady beat. For example: tap a cardboard box with a pencil, pat a balloon with a plastic spoon, or tap a metal pan with a wooden spoon! Let your child be creative and have fun with counting rhythms! This is a lifelong music skill that will be used in every musical endeavor your child chooses!
Online Fun:
Instead of using your purple flashcards, use these games onthe computer:
Say It & Play It (Grand Staff & Use Timer)
Flashcards (All Notes & Use Timer)John Jacob Jingleheimer Smith
This fun song from yourchildhood will get us learning a new style of bass root accompanying. Once we understand this we can improvise on a two handed marching style. It also is another opportunity to feel a half cadence. This song is also another opportunity to feel a half cadence (ends on a yellow chord instead of red).John Jacob Jingleheimer Smith I Can Build a Triad
Like the song says, “Pick any note to be the root… then add a third, and add a fifth!” Now that we are learning chord structure, our skipping snakes will help us to chant and spell each of our triads. Like any language, you speak (sing) it first, and then you can learn to write it. Want to practice making your own Skipping Snakes at home? Print out this PDF file and have fun with your own alphabet magnets at home! Homework theory answer key, all skills videos, and make-up videos for missed classes: (tap, click or scan) There are lots of different variations on our ‘John Jacob’ song. I remembered singing it as ‘Schmidt’ instead of ‘Smith’ as a kid, and instead of ‘look there he goes again’ we would just sing ‘la la la la la la la.’ It can be lots of fun to take a familiar tune and improvise in fun and crazy ways. Which way does your family like best? The Rock’n’Roll, the Sesame Street, or the Sing-a-Ma-Jig version??
Have a musical day!
-Ms. Bethany 🙂
-
Blue Bugs #3
<!-- InstanceBeginEditable name="doctitle" -->Blue Bugs Newsletter<!-- InstanceEndEditable --> Homework theory answer key, all skills videos, and make-up videos for missed classes: (tap, click or scan) Grab a basketball and use the Let’s Play Music bugs to PLAY a game with the ball after you watch this video!
Have a musical day!
-Ms. Bethany 🙂
-
Yellow Arrows #3
<!-- InstanceBeginEditable name="doctitle" -->Yellow Arrows Newsletter<!-- InstanceEndEditable --> Lesson #3 Use this week to get your left hand red-blue chord transition solidified before we add the yellow chord next week. We should be getting to the point where we can play this transition with our eyes closed and even hands together! (That’s tricky because the fingering is different for the RH than the LH. Only try it hands together when the muscle memory is solid in each hand separately).
Celebrate Connection
Here are some practice tips to change things up. The winter blues might be setting in! Try putting red and blue stickers or candies on the keys that should be played for each chord. After practicing them a few times, they get to keep the stickers or eat the candies. Have a parent play through the practice and kiddo watches to be sure mom or dad is getting it right!
A few ideas to bring playfulness to practice time!- Play “Freeze ad Thaw” – Parent or child will say “start”. Child will play until parent randomly says “freeze”. Child will freeze until parent says “thaw”. Then trade places.
- Play your chords with a small washcloth or towel over your hands. Can you do it without peeking? Use your ears to tell you if you are playing the right notes. Make sure you always use the right fingers for each chord!
- Name that tune! In how few of notes can you name a song?
Online Fun:
Since we just added our final melodic pattern, check out this fun Melodic Pattern Matching Memory Game (Level 3) on my website!Caterpillar Song
WOW! Our caterpillars are getting smoother and steadier with this 5 finger pattern! As your child progresses playing this song, watch for these 4 things:- Bubble Hand—at beginning and end of playing, but eventually throughout. Visualize fingers stuck in bubble hand position with honey, caramel, glue, Velcro, etc. to keep them from flying away!
- Strong Independent Fingers—strike the key and make sure that finger comes up when you strike another note. Sing finger numbers with hands together.
- Smooth Sound—indicates finger strength and coordination. Remember SLOW is the way to GO!
- Steady Rhythm—fingers 1, 2, 3 are stronger and they like to go a little faster. Singing and emphasizing finger numbers 5-4-3-2-1-2-3-4-5, Ca-Ter-Pill-Ar, and the lyrics out loud will help keep a steady caterpillar.
This week we focused playing the “Turtle Shell” intervals with the left hand. Everyone agrees that it’s harder than the right hand! Using fingers 4 & 5 is tougher than using 1 & 2. Before playing, warm up with “Where is 4? Where is 5?” then have your child play the interval (a 2nd) with fingers 4 & 5. Repeat for the 3rd, 4th, and 5th. We tried hands together in class, but if that is too much, just focus on left hand only. Once your child masters the intervals with the left hand,THEN play hands together. Enjoy a little twist on the classic game Twister to reinforce and strengthen those finger numbers.
Love Somebody
We LOVE when our parents play along with us! Share more love with your child by playing and singing the melody an octave higher or accompanying together with the chords using the album. Ask your child to teach your family the ‘LOVELY’ game that accompanies this song!
I am Robin Hood
“I am Robin Hood” is used to introduce quarter rests and the dotted quarter – eighth note pattern. The philosophy that feeling a “pulling” feeling will promote correct performance of that particular rhythm pattern, is brought to life in a playful way through the “pulling” of arrows. The open 5th in the left hand is a particularly satisfying sound to young children, resembles the sound of drums and is easy to play! Homework theory answer key, all skills videos, and make-up videos for missed classes: (tap, click or scan) Teaching our students to read music using steps and skips leads to more fluent playing and better sight-readers. Echo Edna helps our students in class be able to recognize steps and skips on the staff, sing them, AND play them. Simon Says to Step or Skip is a fun game to practice this concept at home. You can print and cut out the cards here, or make your own and shuffle them in two different piles (one with step/skip and the other with up/down). ‘Simon’ chooses any note to start on, then chooses one card from each pile and invites the other person to follow those directions. After a few rounds, switch roles. Did you do as Simon Said? A fun way to add tactile and visual reinforcement is to use small pencil top erasers or any small toy as a starting note and then step or skip with another one. It’s so fun!
Have a musical day!
-Ms. Bethany 🙂